Category Archives: Raytracing

Path Tracing 3D Fractals

In some ways path tracing is one of the simplest and most intuitive ways to do ray tracing.

Imagine you want to simulate how the photons from one or more light sources bounce around a scene before reaching a camera. Each time a photon hits a surface, we choose a new randomly reflected direction and continue, adjusting the intensity according to how likely the chosen reflection is. Though this approach works, only a very tiny fraction of paths would terminate at the camera.

So instead, we might start from the camera and trace the ray from here and until we hit a light source. And, if the light source is large and slowly varying (for instance when using Image Based Lighting), this may provide good results.

But if the light source is small, e.g. like the sun, we have the same problem: the chance that we hit a light source using a path of random reflections is very low, and our image will be very noisy and slowly converging. There are ways around this: one way is to trace rays starting from both the camera and the lights, and connect them (bidirectional path tracing), another is to test for possible direct lighting at each surface intersection (this is sometimes called ‘next event estimation’).

Even though the concept of path tracing might be simple, introductions to path tracing often get very mathematical. This blog post is an attempt to introduce path tracing as an operational tool without going through too many formal definitions. The examples are built around Fragmentarium (and thus GLSL) snippets, but the discussion should be quite general.

Let us start by considering how light behaves when hitting a very simple material: a perfect diffuse material.

Diffuse reflections

A Lambertian material is an ideal diffuse material, which has the same radiance when viewed from any angle.

Imagine that a Lambertian surface is hit by a light source. Consider the image above, showing some photons hitting a patch of a surface. By pure geometrical reasoning, we can see that the amount of light that hits this patch of the surface will be proportional to the cosine of the angle between the surface normal and the light ray:

\(
cos(\theta)=\vec{n} \cdot \vec{l}
\)
 
By definition of a Lambertian material this amount of incoming light will then be reflected with the same probability in all directions.

Now, to find the total light intensity in a given (outgoing) direction, we need to integrate over all possible incoming directions in the hemisphere:

\(
L_{out}(\vec\omega_o) = \int K*L_{in}(\vec\omega_i)cos(\theta)d\vec\omega_i
\)
 
where K is a constant that determines how much of the incoming light is absorbed in the material, and how much is reflected. Notice, that there must be an upper bound to the value of K – too high a value would mean we emitted more light than we received. This is referred to as the ‘conservation of energy’ constraint, which puts the following bound on K:

\(
\int Kcos(\theta)d\vec\omega_i \leq 1
\)
 
Since K is a constant, this integral is easy to solve (see e.g. equation 30 here):

\(
K \leq 1/\pi
\)
 
Instead of using the constant K, when talking about a diffuse materials reflectivity, it is common to use the Albedo, defined as \( Albedo = K\pi \). The Albedo is thus always between 0 and 1 for a physical diffuse materials. Using the Albedo definition, we have:

\(
L_{out}(\vec\omega_o) = \int (Albedo/\pi)*L_{in}(\vec\omega_i)cos(\theta)d\vec\omega_i
\)
 
The above is the Rendering Equation for a diffuse material. It describes how light scatters at a single point. Our diffuse material is a special case of the more general formula:

\(
L_{out}(\vec\omega_o) = \int BRDF(\vec\omega_i,\vec\omega_o)*L_{in}(\vec\omega_i)cos(\theta)d\vec\omega_i
\)
 
Where the BRDF (Bidirectional Reflectance Distribution Function) is a function that describes the reflection properties of the given material: i.e. do we have a shiny, metallic surface or a diffuse material.


Completely diffuse material (click for large version)

How to solve the rendering equation

An integral is a continuous quantity, which we must turn into something discrete before we can handle it on the computer.

To evaluate the integral, we will use Monte Carlo sampling, which is a very simple: to provide an estimate for an integral, we will take a number of samples and use the average values of these samples multiplied by the integration interval length.

\(
\int_a^b f(x)dx \approx \frac{b-a}{N}\sum _{i=1}^N f(X_i)
\)
 
If we apply this to our diffuse rendering equation above, we get the following discrete summation:

\(
\begin{align}
L_{out}(\vec\omega_o) &= \int (Albedo/\pi)*L_{in}(\vec\omega_i)cos(\theta)d\vec\omega_i \\
& = \frac{2\pi}{N}\sum_{\vec\omega_i} (\frac{Albedo}{\pi}) L_{in}(\vec\omega_i) (\vec{n} \cdot \vec\omega_i) \\
& = \frac{2 Albedo}{N}\sum_{\vec\omega_i} L_{in}(\vec\omega_i) (\vec{n} \cdot \vec\omega_i)
\end{align}
\)


Test render (click for large version)

Building a path tracer (in GLSL)

Now we are able to build a simple path tracer for diffuse materials. All we need to do is to shoot rays starting from the camera, and when a ray hits a surface, we will choose a random direction in the hemisphere defined by the surface normal. We will continue with this until we hit a light source. Each time the ray changes direction, we will modulate the light intensity by the factor found above:

\(
2*Color*Albedo*L_{in}(\vec\omega_i) (\vec{n} \cdot \vec\omega_i)
\)
 
The idea is to repeat this many times for each pixel, and then average the samples. This is why the sum and the division by N is no longer present in the formula. Also notice, that we have added a (material specific) color. Until now we have assumed that our materials handled all wavelengths the same way, but of course some materials absorb some wavelengths, while reflecting others. We will describe this using a three-component material color, which will modulate the light ray at each surface intersection.

All of this boils down to very few lines of codes:

vec3 color(vec3 from, vec3 dir)
{
  vec3 hit = vec3(0.0);
  vec3 hitNormal = vec3(0.0);
	
  vec3 luminance = vec3(1.0);
  for (int i=0; i < RayDepth; i++) {
    if (trace(from,dir,hit,hitNormal)) {
       dir = getSample(hitNormal); // new direction (towards light)
       luminance *= getColor()*2.0*Albedo*dot(dir,hitNormal);
       from = hit + hitNormal*minDist*2.0; // new start point
    } else {
       return luminance * getBackground( dir );
    }
  }
  return vec3(0.0); // Ray never reached a light source
}

The getBackground() method simulates the light sources in a given direction (i.e. infinitely far away). As we will see below, this fits nicely together with using Image Based Lighting.

But even when implementing getBackground() as a simple function returning a constant white color, we can get very nice images:

and

The above images were lightened only a constant white dome light, which gives the pure ambient occlusion like renders seen above.

Sampling the hemisphere in GLSL

The code above calls a 'getSample' function to sample the hemisphere.

       dir = getSample(hitNormal); // new direction (towards light)

This can be a bit tricky. There is a nice formula for \(cos^n\) sampling of a hemisphere in the GI compendium (equation 36), but you still need to align the hemisphere with the surface normal. And you need to be able to draw uniform random numbers in GLSL, which is not easy.

Below I use the standard approach of putting a seed into a noisy function. The seed should depend on the pixel coordinate and the sample number. Here is some example code:

vec2 seed = viewCoord*(float(subframe)+1.0);

vec2 rand2n() {
    seed+=vec2(-1,1);
	// implementation based on: lumina.sourceforge.net/Tutorials/Noise.html
    return vec2(fract(sin(dot(seed.xy ,vec2(12.9898,78.233))) * 43758.5453),
		fract(cos(dot(seed.xy ,vec2(4.898,7.23))) * 23421.631));
};

vec3 ortho(vec3 v) {
    //  See : http://lolengine.net/blog/2013/09/21/picking-orthogonal-vector-combing-coconuts
    return abs(v.x) > abs(v.z) ? vec3(-v.y, v.x, 0.0)  : vec3(0.0, -v.z, v.y);
}

vec3 getSampleBiased(vec3  dir, float power) {
	dir = normalize(dir);
	vec3 o1 = normalize(ortho(dir));
	vec3 o2 = normalize(cross(dir, o1));
	vec2 r = rand2n();
	r.x=r.x*2.*PI;
	r.y=pow(r.y,1.0/(power+1.0));
	float oneminus = sqrt(1.0-r.y*r.y);
	return cos(r.x)*oneminus*o1+sin(r.x)*oneminus*o2+r.y*dir;
}

vec3 getSample(vec3 dir) {
	return getSampleBiased(dir,0.0); // <- unbiased!
}

vec3 getCosineWeightedSample(vec3 dir) {
	return getSampleBiased(dir,1.0);
}

Importance Sampling

Now there are some tricks to improve the rendering a bit: Looking at the formulas above, it is clear that light sources in the surface normal direction will contribute the most to the final intensity (because of the \( \vec{n} \cdot \vec\omega_i \) term).

This means we might want sample more in the surface normal directions, since these contributions will have a bigger impact on the final average. But wait: we are estimating an integral using Monte Carlo sampling. If we bias the samples towards the higher values, surely our estimate will be too large. It turns out there is a way around that: it is okay to sample using a non-uniform distribution, as long as we divide the sample value by the probability density function (PDF).

Since we know the diffuse term is modulated by the \( \vec{n} \cdot \vec\omega_i = cos(\theta) \), it makes sense to sample from a non-uniform cosine weighted distribution. According to GI compendium (equation 35), this distribution has a PDF of \( cos(\theta) / \pi \), which we must divide by, when using cosine weighted sampling. In comparison, the uniform sampling on the hemisphere we used above, can be thought of either to be multiplied by the integral interval length (\( 2\pi \)), or diving by a constant PDF of \( 1 / 2\pi \).

If we insert this, we end up with a simpler expression for the cosine weighted sampling, since the cosine terms cancel out:

vec3 color(vec3 from, vec3 dir)
{
  vec3 hit = vec3(0.0);
  vec3 hitNormal = vec3(0.0);
	
  vec3 luminance = vec3(1.0);
  for (int i=0; i < RayDepth; i++) {
    if (trace(from,dir,hit,hitNormal)) {
       dir =getCosineWeightedSample(hitNormal);
       luminance *= getColor()*Albedo;
       from = hit + hitNormal*minDist*2.0; // new start point
    } else {
       return luminance * getBackground( dir );
    }
  }
  return vec3(0.0); // Ray never reached a light source
}

Image Based Lighting

It is now trivial to replace the constant dome light, with Image Based Lighting: just lookup the lighting from a panoramic HDR image in the 'getBackground(dir)' function.

This works nicely, at least if the environment map is not varying too much in light intensity. Here is an example:


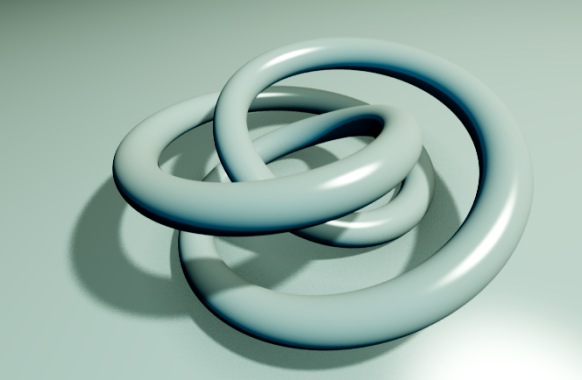
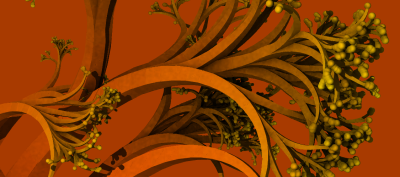
Stereographic 4D Quaternion system (click for large version)

If, however, the environment has small, strong light sources (such as a sun), the path tracing will converge very slowly, since we are not likely to hit these by chance. But for some IBL images this works nicely - I usually use a filtered (blurred) image for lighting, since this will reduce noise a lot (though the result is not physically correct). The sIBL archive has many great free HDR images (the ones named '*_env.hdr' are prefiltered and useful for lighting).

Direct Lighting / Next Event Estimation

But without strong, localized light sources, there will be no cast shadows - only ambient occlusion like contact shadows. So how do we handle strong lights?


Test scene with IBL lighting

Let us consider the sun for a moment.

The sun has an angular diameter of 32 arc minutes, or roughly 0.5 degrees. How much of the hemisphere is this? The solid angle (which corresponds to the area covered of a unit sphere) is given by:

\(
\Omega = 2\pi (1 - \cos {\theta} )
\)
 
where \( \theta \) is half the angular diameter. Using this we get that the sun covers roughly \( 6*10^{-5} \) steradians or around 1/100000 of the hemisphere surface. You would actually need around 70000 samples, before there is even a 50% chance of a pixel actually catching some sun light (using \( 1-(1-10^{-5})^{70000} \approx 50\% \)).


Test scene: naive path tracing of a sun like light source (10000 samples per pixel!)

Obviously, we need to bias the sampling towards the important light sources in the scene - similar to what we did earlier, when we biased the sampling to follow the BRDF distribution.

One way to do this, is Direct Lighting or Next Event Estimation sampling. This is a simple extension: instead of tracing the light ray until we hit a light source, we send out a test ray in the direction of the sun light source at each surface intersection.


Test scene with direct lighting (100 samples per pixel)

Here is some example code:

vec3 getConeSample(vec3 dir, float extent) {
        // Formula 34 in GI Compendium
	dir = normalize(dir);
	vec3 o1 = normalize(ortho(dir));
	vec3 o2 = normalize(cross(dir, o1));
	vec2 r =  rand2n();
	r.x=r.x*2.*PI;
	r.y=1.0-r.y*extent;
	float oneminus = sqrt(1.0-r.y*r.y);
	return cos(r.x)*oneminus*o1+sin(r.x)*oneminus*o2+r.y*dir;
}

vec3 color(vec3 from, vec3 dir)
{
  vec3 hit = vec3(0.0);
  vec3 direct = vec3(0.0);
  vec3 hitNormal = vec3(0.0);
	
  vec3 luminance = vec3(1.0);
  for (int i=0; i < RayDepth; i++) {
    if (trace(from,dir,hit,hitNormal)) {
       dir =getCosineWeightedSample(hitNormal);
       luminance *= getColor()*Albedo;
       from = hit + hitNormal*minDist*2.0; // new start point

       // Direct lighting
       vec3 sunSampleDir = getConeSample(sunDirection,1E-5);
       float sunLight = dot(hitNormal, sunSampleDir);
       if (sunLight>0.0 && !trace(hit + hitNormal*2.0*minDist,sunSampleDir)) {
           direct += luminance*sunLight*1E-5;
       }
    } else {
       return direct + luminance*getBackground( dir );
    }
  }
  return vec3(0.0); // Ray never reached a light source
}

The 1E-5 factor is the hemisphere area covered by the sun. Notice, that you might run into precision errors with the single-precision floats used in GLSL when doing these calculations. For instance, on my graphics card, cos(0.4753 degrees) is exactly equal to 1.0, which means a physically sized sun can easily introduce large numerical errors (remember the sun is roughly 0.5 degrees).

Sky model

To provide somewhat more natural lighting, an easy improvement is to combine the sun light with a blue sky dome.

A slightly more complex model is the Preetham sky model, which is a physically based model, taking different kinds of scattering into account. Based on the code from Simon Wallner I implemented a Preetham model in Fragmentarium.

Here is an animated example, showing how the color of the sun light changes during the day:

Path tracing test from Syntopia (Mikael H. Christensen) on Vimeo.

Fractals

Now finally, we are ready to apply path tracing to fractals. Technically, there is not much new to this - I have previously covered how to do the ray-fractal intersection in this series of blog posts: Distance Estimated 3D fractals.

So the big question is whether it makes sense to apply path tracing to fractals, or whether the subtle details of multiple light bounces are lost on the complex fractal surfaces. Here is the Mandelbulb, rendered with the sky model:


Path traced Mandelbulb (click for larger version)

Here path tracing provides a very natural and pleasant lighting, which improves the 3D perceptions.

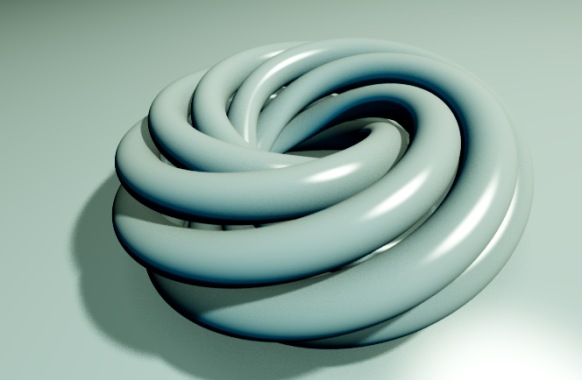
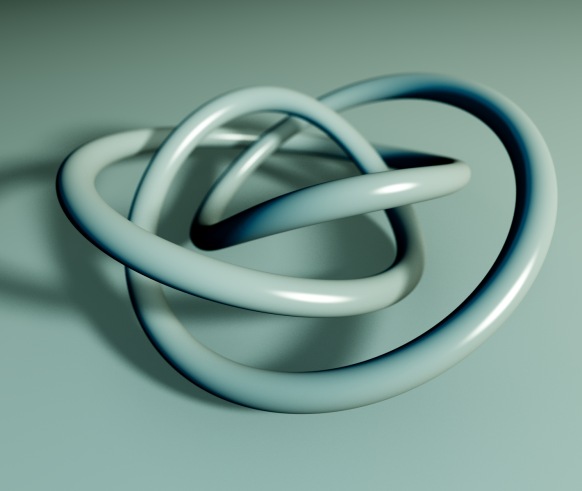
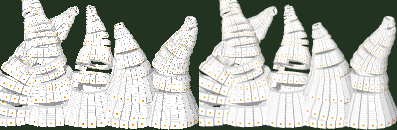
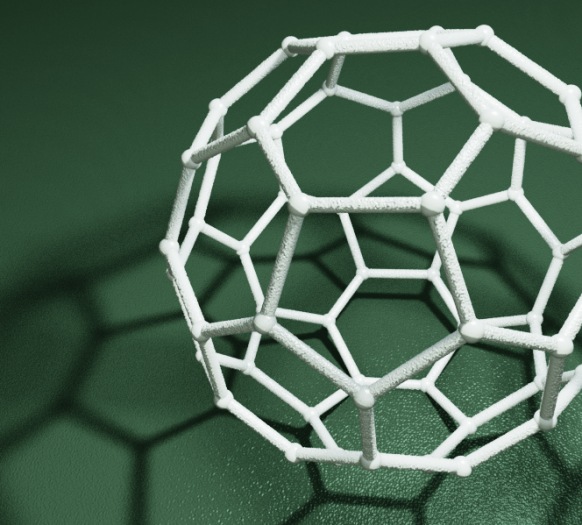
Here are some more comparisons of complex geometry:

Default ray tracer in Fragmentarium


Path traced in Fragmentarium

And another one:

Default ray tracer in Fragmentarium


Path traced in Fragmentarium

What's the catch?

The main concern with path tracing is of course the rendering speed, which I have not talked much about, mainly because it depends on a lot of factors, making it difficult to give a simple answer.

First of all, the images above are distance estimated fractals, which means they are a lot slower to render than polygons (at least of you have a decent spatial acceleration structure for the polygons, which is surprisingly difficult to implement on a GPU). But let me give some numbers anyway.

In general, the rendering speed will be (roughly) proportional to the number of pixels, the FLOPS of the GPU, and the number of samples per pixel.

On my laptop (a mobile mid-range NVIDIA 850M GPU) the Mandelbulb image above took 5 minutes to render at 2442x1917 resolution (with 100 samples per pixel). The simple test scene above took 30 seconds at the same resolution (with 100 samples per pixel). But remember, that since we can show the render progressively, it is still possible to use this at interactive speeds.

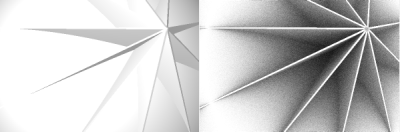
What about the ray lengths (the number of light bounces)?

Here is a comparison as an animated GIF, showing direct light only (the darkest), followed by one internal light bounce, and finally two internal light bounces:

In terms of speed one internal bounce made the render 2.2x slower, while two bounces made it 3.5x slower. It should be noted that the visual effect of adding additional light bounces is normally relatively small - I usually use only a single internal light bounce.

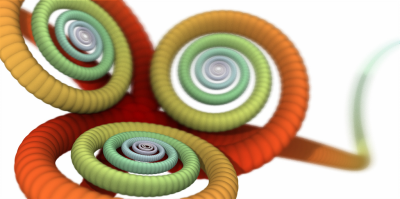
Even though the images above suggests that path tracing is a superior technique, it is also possible to create good looking images in Fragmentarium with the existing ray tracers. For instance, take a look at this image:


(taken from the Knots and Polyhedra series)

It was ray traced using the 'Soft-Raytracer.frag', and I was not able to improve the render using the Path tracer. Having said that, the Soft-Raytracer is also a multi-sample ray tracer which has to use lots of samples to produce the nice noise-free soft shadows.

References

The Fragmentarium path tracers are still Work-In-Progress, but they can be downloaded here:

Sky-Pathtracer.frag (which needs the Preetham model: Sunsky.frag).

and the image based lighting one:

IBL-Pathtracer.frag

The path tracers can be used by replacing an existing ray tracer '#include' in any Fragmentarium .frag file.

External resources

GI Total Compendium - very valuable collection of all formulas needed for ray tracing.

Vilém Otte's Bachelor Thesis on GPU Path Tracing is a good introduction.

Disney's BRDF explorer - Interactive display of different BRDF models - many examples included. The BRDF definitions are short GLSL snippets making them easy to use in Fragmentarium!

Inigo Quilez's path tracer was the first example I saw of using GPU path tracing of fractals.

Evan Wallace - the first WebGL Path tracer I am aware of.

Brigade is probably the most interesting real time path tracer: Vimeo video and paper.

I would have liked to talk a bit about unbiased and consistent rendering, but I don't understand these issues properly yet. It should be said, however, that since the examples I have given terminate after a fixed number of ray bounces, they will not converge to a true solution of the rendering equation (and, are thus both biased and inconsistent). For consistency, a better termination criterion, such as russian roulette termination, is needed.

Combining ray tracing and polygons

I have written a lot about distance estimated ray marching using OpenGL shaders on this blog.

But one of the things I have always left out is how to setup the camera and perspective projection in OpenGL. The traditional way to do this is by using functions such as ‘gluLookAt’ and ‘gluPerspective’. But things become more complicated if you want to combine ray marched shader graphics with the traditional OpenGL polygons. And if you are using modern OpenGL (the ‘core’ context), there is no matrix stack and no ‘gluLookAt’ functions. This post goes through through the math necessary to combine raytraced and polygon graphics in shaders. I have seen several people implement this, but I couldn’t find a thorough description of how to derive the math.

Here is the rendering pipeline we will be using:

It is important to point out, that in modern OpenGL there is no such thing as a model, view, or projection matrix. The green part on the diagram above is completely programmable, and it is possible to do whatever you like there. Only the part after the green box of the diagram (starting with clip coordinates) is fixed by the graphics card. But the goal here is to precisely match the convention of the fixed-function OpenGL pipeline matrices and the GLU functions gluLookAt and gluPerspective, so we will stick to the conventional model, view, and projection matrix terminology.

The object coords are the raw coordinates, for instance as specified in VBO buffers. This is the vertices of an 3D object in its local coordinate system. The next step is to position and orient the 3D object in the scene. This is accomplished by applying the model matrix, that transform the object coordinates to global world coordinates. The model transformation will be different for the different objects that are placed in the scene.

The camera transformation

The next step is to transform the world coordinates into camera or eye space. Now, neither old nor modern OpenGL has any special support for implementing a camera. Instead the conventional gluPerspective always assumes an origo centered camera facing the negative z-direction, and with an up-vector in the positive y-direction. So, in order to implement a generic, movable camera, we instead find a camera-view matrix, and then apply the inverse transformation to our world coordinates – i.e. instead of moving/rotate the camera, we apply the opposite transformation to the world.

Personally, I prefer using a camera specified using a forward, up, and right vector, and a position. It is easy to understand, and the only problem is that you need to keep the vectors orthogonal at all times. So we will use a camera identical to the one implemented in gluLookAt.

The camera-view matrix is then of the form:

\(
\begin{bmatrix}
r.x & u.x & -f.x & p.x \\
r.y & u.y & -f.y & p.y \\
r.z & u.z & -f.z & p.z \\
0 & 0 & 0 & 1
\end{bmatrix}
\)
 
where r=right, u=up, f=forward, and p is the position in world coordinates. R, u, and f must be normalized and orthogonal.

Which gives an inverse of the form:

\(
\begin{bmatrix}
r.x & r.y & r.z & q.x \\
u.x & u.y & u.z & q.y \\
-f.x & -f.y & -f.z & q.z \\
0 & 0 & 0 & 1
\end{bmatrix}
\)
 
By multiplying the matrices together and requiring the result is the identity matrix, the following relations between p and q can be established:

q.x = -dot(r,p), q.y = -dot(u,p), q.z = dot(f,p)
p = -vec3(vec4(q,0)*modelView); 

As may be seen, the translation part (q) of this matrix is the position of the camera expressed in the R,u, and f coordinate system.

Now, per default, the OpenGL shaders use a column-major representation of matrices, in which the data is stored sequentially as a series of columns (notice, that this can be changed by specifying ‘layout (row_major) uniform;’ in the shader). So creating the model-view matrix as an array on the CPU side looks like this:

float[] values = new float[] {
    r[0], u[0], -f[0], 0,
    r[1], u[1], -f[1], 0,
    r[2], u[2], -f[2], 0,
    q[0], q[1], q[2], 1};

Don’t confuse this with the original camera-transformation: it is the inverse camera-transformation, represented in column-major format.

The Projection Transformation

The gluPerspective transformation uses the following matrix to transform from eye coordinates to clip coordinates:

\(
\begin{bmatrix}
f/aspect & 0 & 0 & 0 \\
0 & f & 0 & 0 \\
0 & 0 & \frac{(zF+zN)}{(zN-zF)} & \frac{(2*zF*zN)}{(zN-zF)} \\
0 & 0 & -1 & 0
\end{bmatrix}
\)
 
where ‘f’ is cotangent(fovY/2) and ‘aspect’ is the width to height ratio of the output window.

(If you want to understand the form of this matrix, try this link)

Since we are going to raytrace the view frustum, consider what happens when we transform an direction of the form (x,y,-1,0) from eye space to clip coordinates and further to normalized device coordinates. Since the clip.w in this case will be 1, the x and y part of the NDC will be:

ndc.xy = (x*f/aspect, y*f)

Since normalized device coordinates range from [-1;1], this means that when we ray trace our frustrum, our ray direction (in eye space) must be in the range:

eyeX = [-aspect/f ; aspect/f] 
eyeY = [-1/f ; 1/f] 
eyeZ = -1

where 1/f = tangent(fovY/2).

We now have the necessary ingredients to set up our raytracing shaders.

The polygon shaders

But let us start with the polygon shaders. In order to draw the polygons, we need to apply the model, view, and projection transformations to the object space vertices:

gl_Position = projection * modelView * vertex;

Notice, that we premultiply the model and view matrix on the CPU side. We don’t need them individually on the GPU side. If you wonder why we don’t combine the projection matrix as well, it is because we want to use the modelView to transform the normals as well:

eyeSpaceNormal = mat3(modelView) * objectSpaceNormal; 

Notice, that in general normals transform different from positions. They should be multiplied by the inverse of the transposed 3×3 part of the modelView matrix. But if we only do uniform scaling and rotations, the above will work, since the rotational part of matrix is orthogonal, and the uniform scaling does not matter if we normalize our normals. But if you do non-uniform scaling in the model matrix, the above will not work.

The raytracer shaders

The raytracing must be done in world coordinates. So in the vertex shader for the raytracer, we need figure out the eye position and ray direction (both in world coordinates) for each pixel. Assume that we render a quad, with the vertices ranging from [-1,-1] to [1,1].

The eye position can be easily found from the formula found under ‘the camera transformation’:

eye = -(modelView[3].xyz)*mat3(modelView);

Similar, by transforming the ranges we found above from eye to world space we get that:

dir = vec3(vertex.x*fov_y_scale*aspect,vertex.y*fov_y_scale,-1.0)
	*mat3(modelView);

where fov_y_scale = tangent(fovY/2) is an uniform calculated on the CPU side.

Normally, OpenGL takes care of filling the z-buffer. But for raytracing, we have to do it manually, which can be done by writing to gl_fragDepth. Now, the ray tracing takes place in world coordinates: we are tracing from the eye position and into the camera-forward direction (mixed with camera-up and camera-right). But we need the z-coordinate of the hit position in eye coordinates. The raytracing is of the form:

vec3 hit = p + rayDirection * distance; // hit in world coords

Converting the hit point to eye coordinates gives (the p and q terms cancel):

eyeHitZ = -distance * dot(rayDirection * cameraForward);

which in clip coordinates becomes:

clip.z = [(zF+zN)/(zN-zF)]*eyeHitZ +  (2*zF*zN)/(zN-zF);
clip.w = -eyeHitZ;

Making the perspective divide, we arrive at normalized device coordinates:

ndcDepth = ((zF+zN) + (2*zF*zN)/eyeHitZ)/(zF-zN)

The ncdDepth is in the interval [-1;1]. The last step that remains is to convert into window coordinates. Here the depth value is mapped onto an interval determined by the gl_DepthRange.near and gl_DepthRange.far parameters (usually these are just 0 and 1). So finally we arrive at the following:

gl_FragDepth =((gl_DepthRange.diff * ndcDepth) + gl_DepthRange.near + gl_DepthRange.far) / 2.0;

Putting the pieces together, we arrive at the following for the ray tracing vertex shader:

void main(void)
{
  gl_Position = vertex;
  eye = -(modelView[3].xyz)*mat3(modelView);
  dir = vec3(vertex.x*fov_y_scale*aspect,vertex.y*fov_y_scale,-1.0)
			*mat3(modelView);
  cameraForward = vec3(0,0,-1.0)*mat3(modelView);
}

and this code for the fragment shader:

void main (void)
{
  vec3 rayDirection=normalize(dir);
  trace(eye,rayDirection, distance, color);
  fragColor = color;
  float eyeHitZ = -distance *dot(cameraForward,rayDirection);
  float ndcDepth = ((zFar+zNear) + (2.0*zFar*zNear)/eyeHitZ)
		/(zFar-zNear);
  gl_FragDepth =((gl_DepthRange.diff * ndcDepth) 
		+ gl_DepthRange.near + gl_DepthRange.far) / 2.0;
}

The above is of course just snippets. I’m currently experimenting with a Java/JOGL implementation of the above (Github repo), with some more complete code.

Knots and Polyhedra

Over at Fractal Forums, DarkBeam came up with a Distance Estimator for a trefoil knot in this thread. Here are a few samples, created using the new ‘soft’ raytracer, I’m working on in Fragmentarium:

These kinds of knots are easy to describe by a parametrized curve, but making a distance estimator for them is impressive – I wouldn’t have guessed it was possible at all.

It is also possible to create several variations:

In the same thread, Knighty came up with an impressive figure-8 knot distance estimator:

In another thread at Fractal Forums, Knighty also published an interesting technique (“Fold and Cuts”) for creating a large variety of distance estimated polyhedra:

(If you wonder about the materials, I’ve added some 3D Perlin noise to the distance estimate – this is simple way to creature a structural texture, and it creates true displacements, not just surface normal perturbations).

The threads linked to above contains Fragmentarium scripts with the relevant distance estimators.

Creating a Raytracer for Structure Synth (Part II)

When I decided to implement the raytracer in Structure Synth, I figured it would be an easy task – after all, it should be quite simple to trace rays from a camera and check if they intersect the geometry in the scene.

And it turned out, that it actually is quite simple – but it did not produce very convincing pictures. The Phong-based lighting and hard shadows are really not much better than what you can achieve in OpenGL (although the spheres are rounder). So I figured out that what I wanted was some softer qualities to the images. In particular, I have always liked the Ambient Occlusion and Depth-of-field in Sunflow. One way to achieve this is by shooting a lot of rays for each pixel (so-called distributed raytracing). But this is obviously slow.

So I decided to try to choose a smaller subset of samples for estimating the ambient occlusion, and then do some intelligent interpolation between these points in screen space. The way I did this was to create several screen buffers (depth, object hit, normal) and then sample at regions with high variations in these buffers (for instance at every object boundary). Then followed the non-trivial task of interpolating between the sampled pixels (which were not uniformly distributed). I had an idea that I could solve this by relaxation (essentially iterative smoothing of the AO screen buffer, while keeping the chosen samples fixed) – the same way the Laplace equation can be numerically solved.

While this worked, it had a number of drawbacks: choosing the condition for where to sample was tricky, the smoothing required many steps to converge, and the approach could not be easily multi-threaded. But the worst problem was that it was difficult to combine with other stuff, such as anti-alias and depth-of-field calculations, so artifacts would show up in the final image.

I also played around with screen based depth-of-field. Again I thought it would be easy to apply a Gaussian blur based on the z-buffer depth (of course you have to prevent background objects from blurring the foreground, which complicates things a bit). But once again, it turned out that creating a Gaussian filter for each particular depth actually gets quite slow. Of course you can bin the depths, and reuse the Gaussian filters from a cache, but this approach got complicated, and the images still displayed artifacts. And a screen based method will always have limitations: for instance, the blur from an object hidden behind another object will never be visible, because the object is not part of the screen buffers.

So in the end, I ended up discarding all the hacks, and settled for the much more satisfying solution of simply using a lot of rays for each pixel.

This may sound very slow: after all you need multiple rays for anti-alias, multiple rays for depth-of-field, multiple rays for ambient occlusion, for reflections, and so forth, which means you might end up with a combinatorial explosion of rays per pixel. But in practice there is a nice shortcut: instead of trying all combinations, just choose some random samples from all the possible combinations.

This works remarkably well. You can simulate all these complex phenomena with a reasonably number of rays. And you can use more clever sampling strategies in order to reduce the noise (I use stratified sampling in Structure Synth). The only drawback is, that you need a bit of book-keeping to prepare your stratified samples (between threads) and ensure you don’t get coherence between the different dimensions you sample.

Another issue was how to accelerate the ray-object intersections. This is a crucial part of all raytracers: if you need to check your rays against every single object in the scene, the renders will be extremely slow – the rendering time will be proportional to the number of objects. On the other hand spatial acceleration structures are often able to render a scene in a time proportional to the logarithm of the number of objects.

For the raytracer in Structure Synth I chose to use a uniform grid (aka voxel stepping). This turned out to be a very bad choice. The uniform grid works very well, when the geometry is evenly distributed in the scene. But for recursive systems, objects in a scene often appear at very different scales, making the cells in the grid very unevenly populated.

Another example of this is, that I often include a ground plane in my Structure Synth scenes (by using a flat box, such as “{ s 1000 1000 0.1 } box”). But this will completely kill the performance of the uniform grid – most objects will end up in the same cell in the grid, and the acceleration structure gets useless. So in general, for generative systems with different scales, the use of a uniform grid is a bad choice.

Not that is a lot of stuff, that didn’t work out well. So what is working?

As of now the raytracer in Structure Synth provides a nice foundation for things to come. I’ve gotten the multi-threaded part set correctly up, which includes a system for coordinating stratified samples. Each thread have its own (partial) screen space buffer, which means I can do progressive rendering. This also makes it possible to implement more complex filtering (where the filtered samples may contribute to more than one pixel – in which case the raytracer is not embarrassingly parallel anymore).

What is missing?

Materials. As of now there is only very limited control of materials. And things like transparency doesn’t work very well.

Filtering. As I mentioned above, the multi-threaded renderer supports working with filters, but I haven’t included any filters in the latest release. My first experiments (with a Gaussian filter) were not particularly successful.

Lighting. As of now the only option is a single, white, point-like light source casting hard shadows. This rarely produce nice pictures.

In the next post I’ll talk a bit about what I’m planning for future versions of the raytracers.

Structure Synth 1.5.0 (Hinxton) Released

It has been more than a year since the last release of Structure Synth, but now a new version is finally ready.

The biggest additions are the new raytracer and the scripting interface for animations. The raytracer is not an attempt to create a feature complete renderer, but it makes it possible to create images in a quality acceptable for printing without the complexity of setting up a scene in a conventional raytracer.

New features:

Minor updates:

  • Added support for preprocessor generated random numbers (uniform distributed).
  • Added ‘show coordinate system’ option.
  • Added ‘Autosave Eisenscript’ option to the Template Export Dialog. The autosaved script includes the random seed and camera settings.
  • Context menu with command help in editor window.
  • Proper sorting of transparent OpenGL objects.
  • Added a patch by François Beaune to support Appleseed.
  • GUI Refactoring.

Binaries for Windows (XP, Vista, and 7) and Mac OS X (10.4 and later, universal app). Linux is source only.

As something new, there is now an installer for Windows. It is still possible to just unzip the archived executable, but the Windows installer offers file associations for EisenScript files.

Comments

The raytracer and JavaScript interface are described in more details in the blog posts linked to above.

The OBJ exporter is simpe to use: Choose ‘Export | OBJ Export…’ from the menu. Since the OBJ format does not support spheres, these must be polygonized before export: it is possible to adjust the resolution for this. OBJ does not directly support colors either, so I’ve made it possible to group the OBJ output into sections according to either color or tags (or both). The group and material will be named after the OpenGL color, e.g.


g #f1ffe3
usemtl #f1ffe3
v 8.27049 2.4216 7.09626
...

Another new feature which probably requires a bit of explanation is the preprocessor generated random numbers. They can be used using the following syntax:


10 * { x 3 } 1 * { s random[1,3] } box

The above fragment will produce ten boxes, with a random size between 1 and 3. But notice that each box will have the same size: the ‘random[1,3]’ is substituted at compile-time, not run-time.

I’ve had several request for some way to produce random variation each time a rule is called, but this would require rather large changes to Structure Synth, since the EisenScript program is compiled into a binary structure at compile time, and I would essentially need to turn the builder into a parser to accomodate this (which would be slow).

Well, that’s about it.

Download instructions at:
http://structuresynth.sourceforge.net/download.php

For more information see:
http://structuresynth.sourceforge.net/

Scripting in Structure Synth

I’ve added a JavaScript interface to Structure Synth. This makes it possible to automate and script animations from within Structure Synth. Here is an example:


(Image links to YouTube video)

The JavaScript interface will be part of the next version of Structure Synth (which is almost complete), but it is possible to try out the new features right now, by checking out the sources from the Subversion repository.

The rest of this post shows how to use the JavaScript interface.

Continue reading Scripting in Structure Synth

Assorted Links

Pixel Bender 3D

Adobe has announced Pixel Bender 3D:


If I understand it correctly, it is a new API for Flash, and not as such a direct extension of the Pixel Bender Toolkit. So what does it do?

As far as I can tell, it is simply a way to write vertex and fragment shader for Flash. While this is certainly nice, I think Adobe is playing catchup with HTML5 here – many browsers already support custom shaders through WebGL (in their development builds, at least). Or compare it to a modern 3D browser plugin such as Unity, with deferred lightning, depth-of-field, and occlusion culling…

And do we really need another shader language dialect?

Flash raytracer

Kris Temmerman (Neuro Productions) has created a raytracer in Flash, complete with ambient occlusion and depth-of-field:

Kris has also produced several other impressive works in Flash:

Chaos Constructions

Quite and Orange won the 4K demo at Chaos Constructions 2010 with the very impressive ‘CDAK’ demo:

(Link at Pouet, including executable).

Ex-Silico Fractals

This YouTube video shows how to produce fractals without a computer. I’ve seen video feedback before, but this is a clever setup using multiple projectors to create iterated function systems.


Vimeo Motion Graphics Award

‘Triangle’ by Onur Senturk won the Vimeo Motion Graphics Award. The specular black material looks good. Wonder if I could create something similar in Structure Synth’s internal raytracer?

Creating a Raytracer for Structure Synth

Updated november 17th, 2011

Structure Synth has quite flexible support for exporting geometry to third-party raytracers, but even though I’ve tried to make it as simple as possible, the Template Export system can be difficult to use. It requires knowledge of the scene description format used by the target raytracer, and of the XML format used by the templates in Structure Synth. Besides that, exporting and importing can be slow when dealing with complicated geometry.

So I decided to implement a simple raytracer inside Structure Synth. I probably could have integrated some existing open-source renderer, but I wanted to have a go at this myself. The design goal was to create something reasonably fast, aiming for interesting, rather than natural, results.

The first version of the raytracer is available now in SVN, and will be part of the next Structure Synth release.

How to use the raytracer

The raytracer has a few settings which can be controlled by issuing ‘set’ commands in the EisenScript.

The following is a list of commands with their default values given as argument:

set raytracer::light [0.2,0.4,0.5]

Sets the position of a light in the scene. If a light source position is not specified, the default position is a light placed at the lower, left corner of the viewport. Notice that only a single light source is possible as of now. This light source controls the specular and diffuse lightning, and the hard shadow positions. The point light source model will very likely disappear in future versions of Structure Synth – I’d prefer environment lightning or something else that is easier to setup and use.

set raytracer::shadows true

This allows you to toggle hard shadows on or off. The shadow positions are determined by the light source position above.


Rendering without and with anti-alias enabled

set raytracer::samples 6

This sets the number of samples per pixel. Notice the actual number of samples is the square of this argument, i.e. a value of 2 means 2×2 camera rays will be traced for each pixel. The default value is 6×6 samples for ‘Raytrace (in Window)’ and 8×8 samples for ‘Raytrace (Final)’. This may sound like a lot of samples per pixel, but the number of samples also control the quality of the depth-of-field or ambient occlusion rendering. If the image appears noisy, increase the sample count.


To the left, a render with a single Phong light source. To the right, the same picture using ambient occlusion

set raytracer::ambient-occlusion-samples 1

Ambient occlusion is a Global Illumination technique for calculating soft shadows based on geometry alone. Per default the number of samples is set to 1. This may not sound like a lot, but each pixel will be sampled multiple times courtesy of the ‘raytracer::samples’ count – this makes sense because the ‘raytracer::samples’ will be used to sample both the lens model (for anti-alias and depth-of-field) and the ambient occlusion. And when I get a chance to implement some better shader materials, the samples can also be used there as well. Notice, that as above, the number refers to samples per dimensions. Example: if ‘raytracer::ambient-occlusion-samples = 3’ and ‘raytracer::samples = 2’, a total of 3x3x2x2=36 samples will be used per pixel.


Depth-of-Field example

set raytracer::dof [0.23,0.2]

Enables Depth-Of-Field calculations. The first parameter determines the distance to the focal plane, in terms of the viewport coordinates. It is always a number between 0 and 1. The second parameter determines how blurred objects away from the focal plane appear. Higher values correspond to more blurred foregrounds and backgrounds.

Hint: in order to get the viewport plane distance to a given object, right-click the OpenGL view, and ‘Toggle 3D Object Information’. This makes it possible to fit the focal plane exactly.

set raytracer::size [0x0]

Sets the size of the output window. If the size is 0x0 (the default choice), the output will match the OpenGL window size. If only one dimension is specified, e.g. ‘set raytracer::size [0x600]’, the missing dimension will be calculated such that the aspect ratio of the OpenGL window will be matched. Be careful when specifying both dimensions: the aspect ratio may be different.

set raytracer::max-threads 0

This determines how many threads, Structure Synth will use during the rendering. The default value of 0, means the system will suggest an ideal number of threads. For a dual-core processor with hyper-threading, this means four threads will be used. Lower the number of threads, if you want to use the computer for other tasks, and it is unresponsive.

set raytracer::voxel-steps 30

This determines the resolution of the uniform grid used to accelerate ray intersections. Per default a simple heuristic is used to control the resolution based on the number of objects. A value of 30 means that a grid with 30x30x30 cells will be used. The uniform grid used by the raytracer is not very efficient for non-uniform structure, and will likely be replaced in a future version of Structure Synth.

set raytracer::max-depth 5

This is the maximum recursion depth of the raytracer (for transparent and reflective materials).

Finally two material settings are available:

set raytracer::reflection 0.0

Simple reflection. A value between 0 and 1.

set raytracer::phong [0.6,0.6,0.3]

The first number determines the ambient lightning, the second the diffuse, and the third the specular lightning. Diffuse and specular lightning depends on the location of the light source.

It is also possible to apply the materials to individual primitives in Structure Synth directly. This is done by tagging the objects.

Consider the following EisenScript fragment:

Rule R1 {
   { x 1 } sphere::mymaterial
   R1
}

The sphere above now belongs to the ‘mymaterial’ class, and its material settings may be set using the following syntax:

set raytracer::mymaterial::reflection 0.0
set raytracer::mymaterial::phong [0.6,0.6,0.0]

An important tip: writing these long parameter setting names is tedious and error-prone. But I’ve added a list with the most used EisenScript and Raytracer commands to the context menu in Structure Synth editor window. Just right-click and select a command.