Updated november 17th, 2011
Structure Synth has quite flexible support for exporting geometry to third-party raytracers, but even though I’ve tried to make it as simple as possible, the Template Export system can be difficult to use. It requires knowledge of the scene description format used by the target raytracer, and of the XML format used by the templates in Structure Synth. Besides that, exporting and importing can be slow when dealing with complicated geometry.
So I decided to implement a simple raytracer inside Structure Synth. I probably could have integrated some existing open-source renderer, but I wanted to have a go at this myself. The design goal was to create something reasonably fast, aiming for interesting, rather than natural, results.
The first version of the raytracer is available now in SVN, and will be part of the next Structure Synth release.
How to use the raytracer
The raytracer has a few settings which can be controlled by issuing ‘set’ commands in the EisenScript.
The following is a list of commands with their default values given as argument:
set raytracer::light [0.2,0.4,0.5]
Sets the position of a light in the scene. If a light source position is not specified, the default position is a light placed at the lower, left corner of the viewport. Notice that only a single light source is possible as of now. This light source controls the specular and diffuse lightning, and the hard shadow positions. The point light source model will very likely disappear in future versions of Structure Synth – I’d prefer environment lightning or something else that is easier to setup and use.
set raytracer::shadows true
This allows you to toggle hard shadows on or off. The shadow positions are determined by the light source position above.
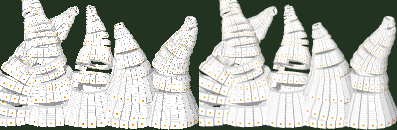
Rendering without and with anti-alias enabled
set raytracer::samples 6
This sets the number of samples per pixel. Notice the actual number of samples is the square of this argument, i.e. a value of 2 means 2×2 camera rays will be traced for each pixel. The default value is 6×6 samples for ‘Raytrace (in Window)’ and 8×8 samples for ‘Raytrace (Final)’. This may sound like a lot of samples per pixel, but the number of samples also control the quality of the depth-of-field or ambient occlusion rendering. If the image appears noisy, increase the sample count.

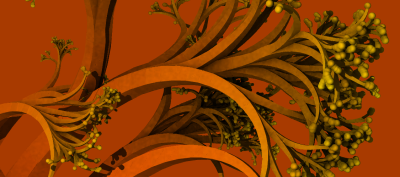
To the left, a render with a single Phong light source. To the right, the same picture using ambient occlusion
set raytracer::ambient-occlusion-samples 1
Ambient occlusion is a Global Illumination technique for calculating soft shadows based on geometry alone. Per default the number of samples is set to 1. This may not sound like a lot, but each pixel will be sampled multiple times courtesy of the ‘raytracer::samples’ count – this makes sense because the ‘raytracer::samples’ will be used to sample both the lens model (for anti-alias and depth-of-field) and the ambient occlusion. And when I get a chance to implement some better shader materials, the samples can also be used there as well. Notice, that as above, the number refers to samples per dimensions. Example: if ‘raytracer::ambient-occlusion-samples = 3’ and ‘raytracer::samples = 2’, a total of 3x3x2x2=36 samples will be used per pixel.
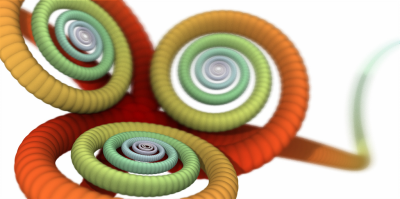
Depth-of-Field example
set raytracer::dof [0.23,0.2]
Enables Depth-Of-Field calculations. The first parameter determines the distance to the focal plane, in terms of the viewport coordinates. It is always a number between 0 and 1. The second parameter determines how blurred objects away from the focal plane appear. Higher values correspond to more blurred foregrounds and backgrounds.
Hint: in order to get the viewport plane distance to a given object, right-click the OpenGL view, and ‘Toggle 3D Object Information’. This makes it possible to fit the focal plane exactly.
set raytracer::size [0x0]
Sets the size of the output window. If the size is 0x0 (the default choice), the output will match the OpenGL window size. If only one dimension is specified, e.g. ‘set raytracer::size [0x600]’, the missing dimension will be calculated such that the aspect ratio of the OpenGL window will be matched. Be careful when specifying both dimensions: the aspect ratio may be different.
set raytracer::max-threads 0
This determines how many threads, Structure Synth will use during the rendering. The default value of 0, means the system will suggest an ideal number of threads. For a dual-core processor with hyper-threading, this means four threads will be used. Lower the number of threads, if you want to use the computer for other tasks, and it is unresponsive.
set raytracer::voxel-steps 30
This determines the resolution of the uniform grid used to accelerate ray intersections. Per default a simple heuristic is used to control the resolution based on the number of objects. A value of 30 means that a grid with 30x30x30 cells will be used. The uniform grid used by the raytracer is not very efficient for non-uniform structure, and will likely be replaced in a future version of Structure Synth.
set raytracer::max-depth 5
This is the maximum recursion depth of the raytracer (for transparent and reflective materials).
Finally two material settings are available:

set raytracer::reflection 0.0
Simple reflection. A value between 0 and 1.
set raytracer::phong [0.6,0.6,0.3]
The first number determines the ambient lightning, the second the diffuse, and the third the specular lightning. Diffuse and specular lightning depends on the location of the light source.
It is also possible to apply the materials to individual primitives in Structure Synth directly. This is done by tagging the objects.
Consider the following EisenScript fragment:
Rule R1 {

     { x 1 } sphere::mymaterial

     R1

}
The sphere above now belongs to the ‘mymaterial’ class, and its material settings may be set using the following syntax:
set raytracer::mymaterial::reflection 0.0

set raytracer::mymaterial::phong [0.6,0.6,0.0]
An important tip: writing these long parameter setting names is tedious and error-prone. But I’ve added a list with the most used EisenScript and Raytracer commands to the context menu in Structure Synth editor window. Just right-click and select a command.